This tutorial will walk through setting up modular/feature-based licensing using Instant Protection PLUS 3.
There are two ways to handle modules with Instant Protection PLUS 3. One method is to use the Instant Protection PLUS 3 API to read the module bit field from the license file and enabling/disabling features of your application based on these bits.
The other method is used when you have separate pieces of your application such as in a suite. For example, if you sell a suite for image manipulation, you may have an application to edit images, an application to organize the images the hard drive, and an application to create image library CD's. Using the second method of modular licensing you can protect each application a certain way to assign each application a bit in the modular bit field of the license file. This method requires you to use the "This is a modular application" option on the Activation Options step of the Instant Protection PLUS 3 wizard, and does not require the use of the Instant Protection PLUS 3 API.
Only the first method will be shown in this tutorial, as most developers want to enable/disable features within the same application. This method requires that the "This is a modular application" option be unchecked on the Activations Options step of the Instant Protection PLUS 3 wizard.
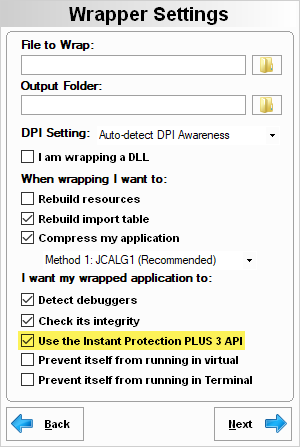
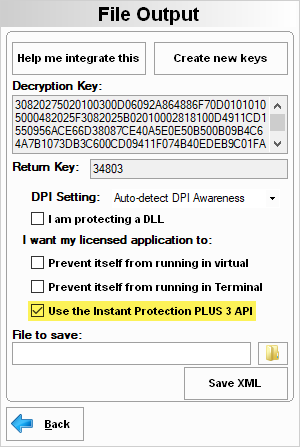
The only other necessary Instant Protection PLUS 3 wizard setting is on the final step, which will either be the Wrapper Settings step (when using the Instant Protection PLUS 3 wrapper) or File Output step (when using the Instant Protection PLUS 3 DLL):
Enabling the"Use the Instant Protection PLUS 3 API" option allows you to make Instant Protection PLUS 3 API function calls from the application to get or set data in the local license file. If using the Instant Protection PLUS 3 wrapper, you will need to re-wrap your application to apply this setting. If using the Instant Protection PLUS 3 DLL, you will need to save a new XML file to apply this setting.
When a customer activates your application, a bit field can be written to field 22 of the license file. To determine which modules/features should be enabled, you can read the bit field from the license file and then enable the appropriate features based on each bit. Making a call to WR_LFGetNum in you application's code will get this bit field. Please review the section on using the Instant Protection PLUS 3 API for more information.
The code would be as follows:
Note that you must call the WR_Close function when your applications closes to free resources used by the Instant Protection PLUS 3 runtime:
You will first need to add a new Product Option in SOLO Server. If you've already synced to a Product Option in the Instant Protection PLUS 3 wizard, you can use the Duplicate button in SOLO Server to create a new subscription Product Option with the same Trigger Code Seed, RegKey 2 Seed, and Off Act Key values, which will allow the new Product Option to activate your application. View this topic for more information on product configuration.
To configure a Product Option that will activate the application and enable modules 1, 3 and 4, use the following settings:
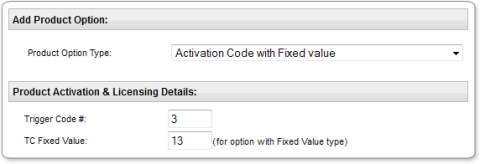
Trigger Code 3 tells the licensing runtime to set the license file to an activated status and set field 22 in the license file to the value entered in the TC Fixed Value field. Since we want to enable modules 1, 3 and 4, the bit field needs to be equal to 00000000001101 in binary. 1101 = 13 in decimal, so the TC Fixed Value needs to be 13. This will store the bit field 00000000001101 into field 22 of the local license file when a customer activates with a license generated from this Product Option.
If you want to enable a different set of modules, you would create a different Product Option with a different TC Fixed Value. Use the Duplicate setting at the top of a Product Option page in SOLO Server to make this easier. Since Instant Protection PLUS 3 can only pass a 14-bit value during a single activation, you are limited to enabling or disabling 14 features. The Protection PLUS 5 SDK does not have this limitation.
Both Trigger Code 3 and Trigger Code 4 are used for modular activations and work the same with one major difference. Trigger Code 3 will blindly overwrite the license file field 22 with the data value. This will erase any previous value and set a new bit field based on your data value. While this generally works great, there may be a circumstance where you have already activated the license with a bit field and just want to add another module to the existing value. Trigger Code 4 will take the data value and OR it with the current value of the license file field 22. This allows you to turn on a module (bit) without affecting any existing activated modules.
To activate the application manually (by phone or email) using Instant Protection PLUS 3, open the Instant Protection PLUS 3 .ipp file for the product you want to activate and click the Generate activation codes tab. We will use Trigger Code 3 in this case. This Trigger Code tells the licensing runtime to set the license file to an activated status and set field 22 in the license file with the value entered in the Data (X) field.
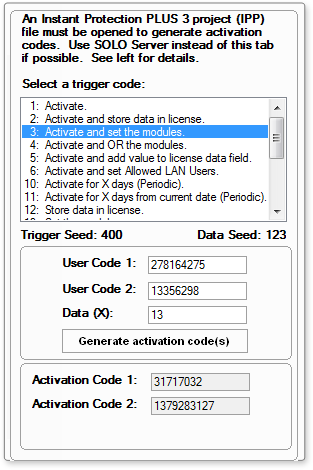
The customer will provide User Code 1 and User Code 2 numbers, which are entered into the corresponding fields. Set the Data (X) field to the bit field of the modules you would like to activate. This is limited to a 14-bit data value. In this example, we want to enable modules 1, 3 and 4, which means that the bit field be equal to 00000000001101 in binary. 1101 = 13 in decimal, so the Data(X) value needs to be 13. Enter 13 in the Data (X) field and click the Generate Code button, and then send the Activation Code 1 and Activation Code 2 numbers back to the customer. Once they enter these values, their license will be activated and the value 13 will be stored in the license file field 22.
If you want to enable a different set of modules, you would use a different Data(X) value.
Both Trigger Code 3 and Trigger Code 4 are used for modular activations and work the same with one major difference. Trigger Code 3 will blindly overwrite the license file field 22 with the data value. This will erase any previous value and set a new bit field based on your data value. While this generally works great, there may be a circumstance where you have already activated the license with a bit field and just want to add another module to the existing value. Trigger Code 4 will take the data value and OR it with the current value of the license file field 22. This allows you to turn on a module (bit) without affecting any existing activated modules.