One of the core ELM features of SOLO Server is the ability to remotely deactivate licenses. This relies on Instant Protection PLUS 3 having the "Query SOLO Server to periodically validate the license status" option enabled, which is needed to see if your application's license has been deactivated. There are two different ways in which a license may be deactivated: you can deactivate an entire license, which means any system previously activated will no longer be authorized to use your protected application; or you can deactivate an individual system that has been activated.
Deactivating an entire license in SOLO Server allows you to disable any system which has activated with a particular license once it checks in with SOLO Server. It will also not allow any new activations to be processed, even if the license has one or more Activations Left. This can be useful in scenarios such as:
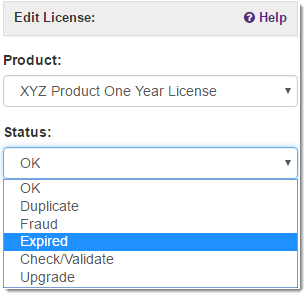
To deactivate a license, simply sign-in to SOLO Server's administrative interface (SOLO Server Shared URL), find the appropriate License ID and bring up the License Details page (you can get to this page by searching for the License ID, or by searching for the customer or invoice and clicking on the License ID's hyperlink shown below the customer or invoice details). Then on the License Details page, click the Actions dropdown and choose Edit. and change the Status to something other than "OK" such as Duplicate, Fraud, Expired or Check/Validate. In all these cases, it will deactivate all current activations/installations for this license upon the next contact with the server, and not allow any new activations:
The result of choosing "Upgrade" is dependent on the Upgrade Behavior setting for this product option. The available options are:
If you choose to allow deactivations for your software, it will allow your customers to transfer their activation(s) between machines. The following are required to deactivate an individual installation through SOLO Server:
It is very important to use the "Query SOLO Server to periodically validate the license status" option enabled when allowing users to deactivate your application! This option is how remote deactivations are enforced and also helps prevent users from restoring the entire system/computer from an image or snapshot taken before deactivation occurred.
When a customer activates a license using SOLO Server, he or she is issued an "Installation ID" which corresponds with that activation. Since each activation receives its own, unique Installation ID, it is possible to manage and deactivate individual computer's or systems which were previously activated.
A successful deactivation will automatically increment the Activations Left count on the license, allowing the user to activate on a different machine.
A deactivation can be initiated directly from the licensed application, or it can be remotely deactiavted through SOLO Server or the Customer License Portal.
A deactivation can be initiated by the customer using your application if you implement the WR_DeactivateInstallaion function call from the Instant Protection PLUS 3 API. This is convenient way for your customers to transfer the license from one system to another on their own.
The customer will be prompted to confirm they want to deactivate:
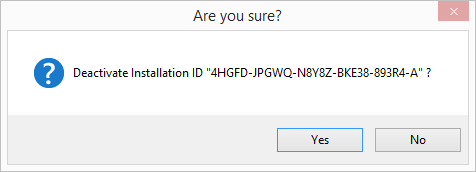
This will deactivate the installation immediately.
Similar to using the Instant Protection PLUS 3 API, the /DEACTIVATE command line switch can be used by a customer who has access to the installation that needs to be deactivated. You could add a "Deactivate Application" shortcut that uses this command line switch.
The author of the application can deactivate the license remotely through SOLO Server. Sign-in to SOLO Server's administrative interface (SOLO Server Shared URL) and find the appropriate License ID and bring up the License Details page (you can get to this page by searching for the License ID, or by searching for the customer or invoice and clicking on the License ID's hyperlink shown below the customer or invoice details).
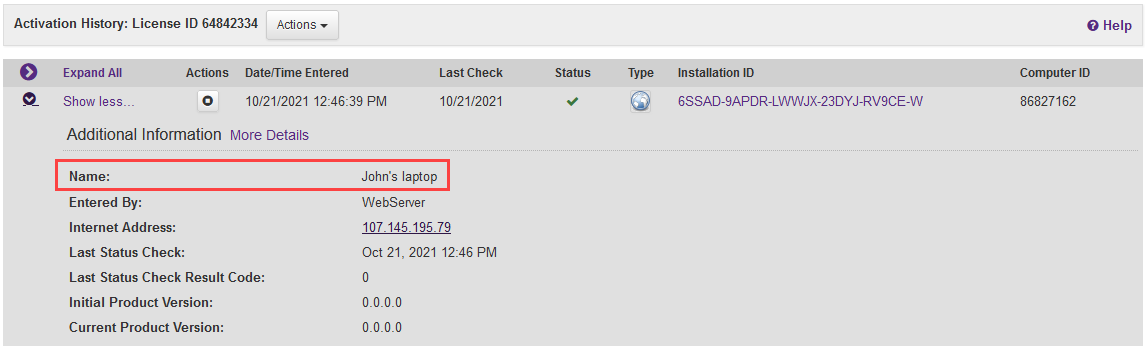
Then, click the Activations drop down and choose View Installation History, find the Installation ID that corresponds with the computer which was originally activated, and click the Deactivate Installation button under the Actions column.
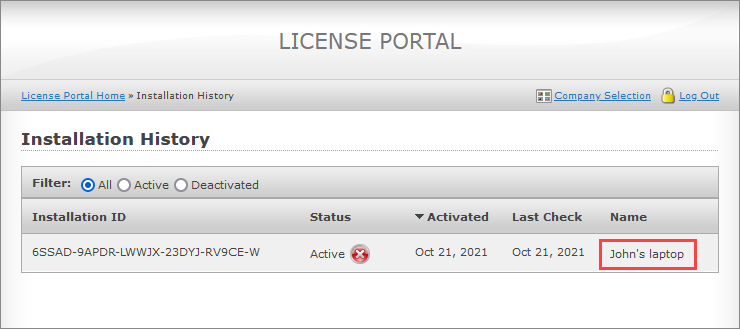
If you enabled the option for specifying an Installation Name during the activation process, this can make it easier to identify installations:
If you don't see a deactivate button, make sure you have enabled Allow Deactivations in the Product Option settings for this license type, and also confirm that there is at least one Deactivation Left for this License ID.
You can also search for a specific Installation ID using the SOLO Server Search page. You can use the Instant Protection PLUS 3 API function WR_LFGetString to display the Installation ID to the customer in your application.
You can give your customers the option of deactivating through the Customer License Portal. This is useful since it doesn't require that they have access to the installation/machine they want to deactivate.
If you enabled the option for specifying an Installation Name during the activation process, this can make it easier to identify installations: