One of the core ELM features of SOLO Server is the ability to remotely deactivate licenses. This relies on background checking and refreshing via Protection PLUS 5 SDK in your application, which is needed to periodically check with SOLO Server to see if your application's license has been deactivated. There are two different ways in which a license may be deactivated: you can deactivate an entire license, which means any system previously activated will no longer be authorized to use your protected application; or you can deactivate an individual system that has been activated.
Deactivating an entire license in SOLO Server allows you to disable any system which was activated with a particular license. This can be useful in scenarios such as:
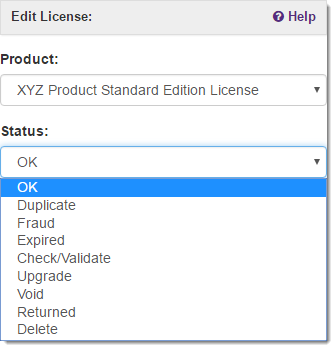
To deactivate a license, simply sign-in to SOLO Server's administrative interface, find the appropriate License ID and bring up the License Details page (you can get to this page by searching for the License ID, or by searching for the customer or invoice and clicking on the License ID's hyperlink shown below the customer or invoice details). Then, click the Edit link on the License Details page, and change the status to something other than 'OK' (as shown below).
In most cases, you would change a license to Duplicate if the customer purchased a second license by mistake, Fraud if the payment has been disputed, Expired if there is some other general reason to disable the license, or Check/Validate if there is a reason that the license should be reviewed. The Upgrade status will only deactivate the license if the Upgrade Behavior is set to Deactivate in the product option settings for the license.
For self hosted SOLO Server users with the Master User ID permission, the status can also be set to Void if there is some other general reason to disable the license, or Returned if the customer requested a refund.
When a customer activates a license using SOLO Server, he or she is issued an "Installation ID" which corresponds with that activation. Since each activation receives its own unique Installation ID, it is possible to manage and deactivate individual computer's or systems which were previously activated. An example of when you would use this functionality would be when a customer encounters a hardware/computer failure that renders the prior activation unusable. By deactivating the Installation ID associated with that computer, you can rest easy that your protected application will see that it has been deactivated the next time it does a background check or refreshes its license. Additionally, deactivating an Installation ID will increment the number of activations allowed for a license, so doing this also enables your customer to activate on a new computer.
An Installation ID can be deactivated remotely through the SOLO Server author interface. Sign-in to SOLO Server's administrative interface, find the appropriate License ID and bring up the License Details page (you can get to this page by searching for the License ID, or by searching for the customer or invoice and clicking on the License ID's hyperlink shown below the customer or invoice details). Note that the "Deactivations Left" (on the License Details page) will need to be 1 or greater for deactivation to be available.
Next, click the drop-down Activations / View Installation History, find and click on the Installation ID that corresponds with the computer which was originally activated, and click the Deactivate Installation button under the Actions column. You can also search by Installation ID directly, but if the "Deactivate Installation" button is not present, you may need to click the "View License" link in the bread crumbs (near the top of the page) and increment the "Deactivations Left" field to enable this option.
An Installation ID can also be deactivated remotely though the customer license portal by the customer if you choose to allow this option.